A Guide to Three Point Lighting Techniques
Looking for a guide to three point lighting techniques? Look no further…
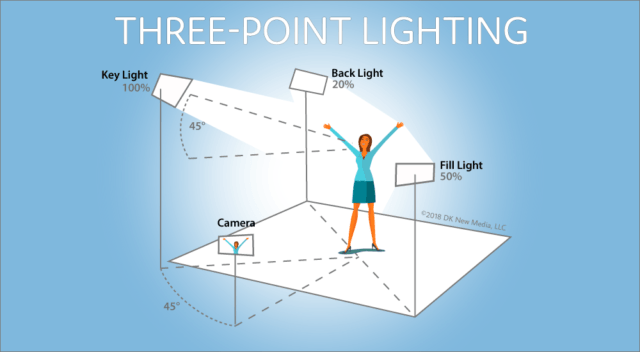
Three-point lighting is one of video production’s most fundamental and commonly used lighting techniques. It involves three separate lights placed strategically around the subject in order to create a desired look and atmosphere. In this guide, we will go over the basics of three-point lighting setups, including how they are typically set up and why they are used.
What is Three Point Lighting?
Three-point lighting is a technique that uses three different lights to create a balanced and attractive look when filming video footage. Typically, these three lights comprise of a key light, a fill light and a backlight (also sometimes referred to as an “edge” or “rim” light). The key light is usually placed at an angle slightly above the subject in order to produce good contrast between the subject and its background. The second light, named the fill light, helps even out harsh shadows created by the key light. Finally, the backlight (or rim) is positioned behind or beside the subject in order to add definition and separation from any background elements; it’s also often coloured for more creative looks!
Why Use Three Point Lighting?
Three-point lighting is essential if you want to achieve high-quality results with your video footage. By having multiple lights set up around your subject, you can create balanced exposure levels throughout the image while also being able to adjust different parts of the scene separately depending on what mood you’re going for. This technique allows for great versatility in terms of both composition and colour grading within post-production stages too! Additionally, setting up multiple lights means you’ll have more control over shadows cast by objects within the frame as well as allowing you to produce effects such as reflections off surfaces – this makes it perfect for achieving those cinematic looks that everyone loves!
Setting Up Your Lights
Once you’ve gathered all the necessary equipment needed for your setup – such as stands, clamps etc. – it’s time to get your crew together in order to place each of your lights properly. Each type of lamp should be given its own stand/clamp so that it’s easy to move them around independently without affecting other lamps nearby – take care when doing this though as some lamps may require special adapters or accessories which should be prepped beforehand! After everything has been placed correctly, then it’s finally ready for testing!
Testing & Adjusting Your Lights
Before actually shooting any footage with your setup, you must perform tests first to make sure all parameters are appropriate according to what type of look/atmosphere you’re aiming for with your project. Take some time experimenting with various placement angles/distances between lamps as well as adjusting their intensity settings according to desired levels – be sure not to overexpose or underexpose certain areas within the frame while doing this either; use different flags/cutters if needed too so that unwanted glare doesn’t interfere within scenes too much either! Once everything has been tweaked perfectly, then start filming away knowing all preparations have been met prior, and results will be outstanding once editing concludes further downstream during post-production stages.
We hope you have found this Guide to Three Point Lighting Techniques helpful. Here, at ELO Media, we’ve been producing videos for many years and use a number of lighting techniques to ensure we get the best-looking scene. If you’d like to chat about any aspect of video production, we’d love to hear from you.
Contact us at Sales@elo.co.uk or call 01202 805091

